Use Your Own Domain
Serve your chat interface from your own domain (like support.yourcompany.com) instead of the default Axie Studio URL.
Why Use a Custom Domain?
Professional Appearance
Customers see your domain, not public.axiestudio.se. Builds trust and brand recognition.
Better SEO
Your domain helps with search engine optimization.
Brand Consistency
Everything stays under your brand - website, support, chat interface.
Easy to Remember
Customers can visit support.yourcompany.com directly.
How It Works
When a customer visits your custom domain:
- DNS routes to Axie Studio servers
- Axie Studio detects your domain
- Your chat interface loads automatically
- Customer sees your domain in the URL (not Axie Studio's)
The customer never sees public.axiestudio.se - they only see your domain!
Setting Up a Custom Domain
Here's the complete process, step by step. Don't worry - it's simpler than it sounds!
Step 1: Add Your Domain
- Go to Dashboard -> Domains
- Click "Add Domain" button (top right)
- Enter your domain name (e.g.,
support.yourcompany.com) - Select which chat interface you want this domain to show
- Click "Add Domain"
Pro Tip: Use a subdomain like support or chat rather than your main domain (yourcompany.com). This is:
- Easier to configure (doesn't affect your main website)
- Safer (if something goes wrong, your main site isn't affected)
- More flexible (you can have multiple subdomains for different purposes)
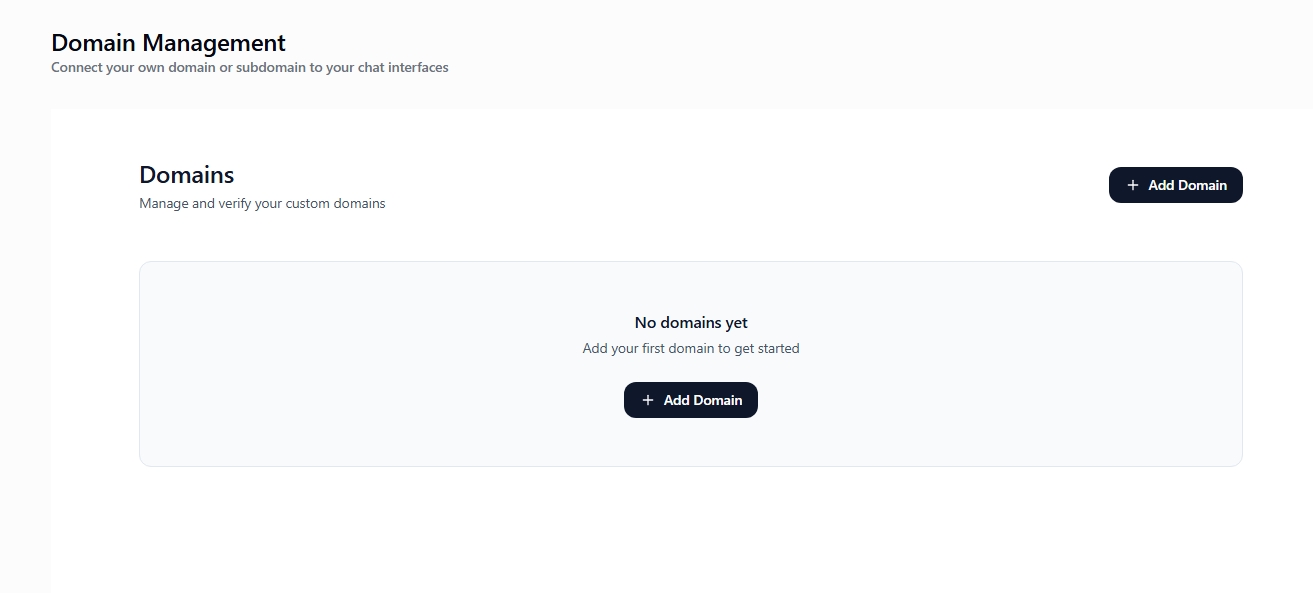
This is your domain management dashboard. You'll see statistics at the top (how many domains are verified, pending, etc.) and a list of all your domains below. Each domain shows its status, which chat interface it's connected to, and quick action buttons.
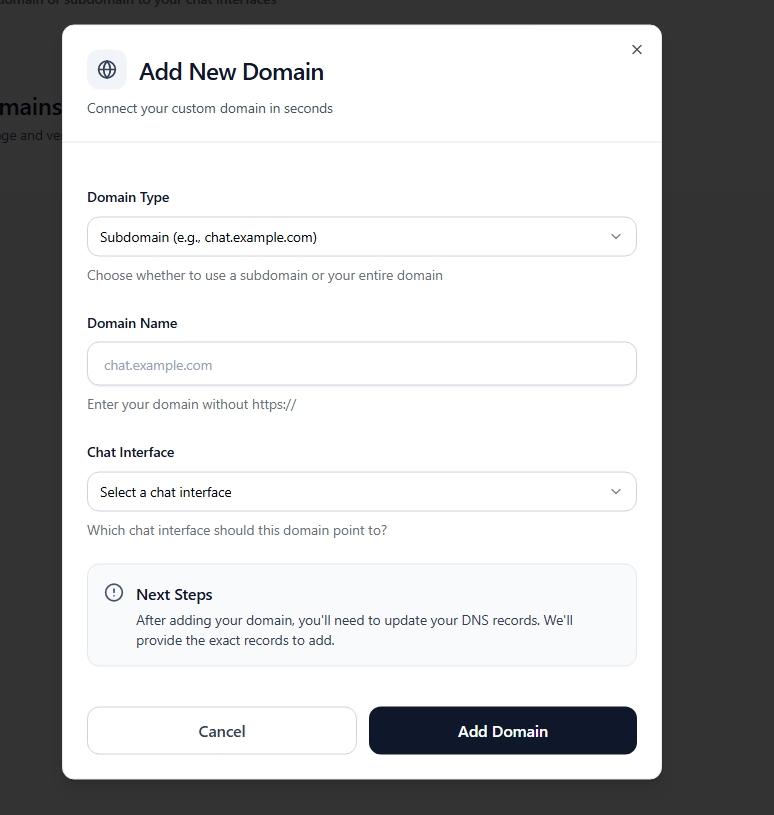
The "Add Domain" dialog is simple - just two fields. Enter your full domain name (like support.yourcompany.com) and pick which chat interface should appear when someone visits that domain.
What happens when you add a domain?
- Axie Studio registers your domain with our hosting provider (Vercel)
- You'll immediately see DNS instructions that you need to add
- Your domain status will be "Pending" until you complete the DNS setup
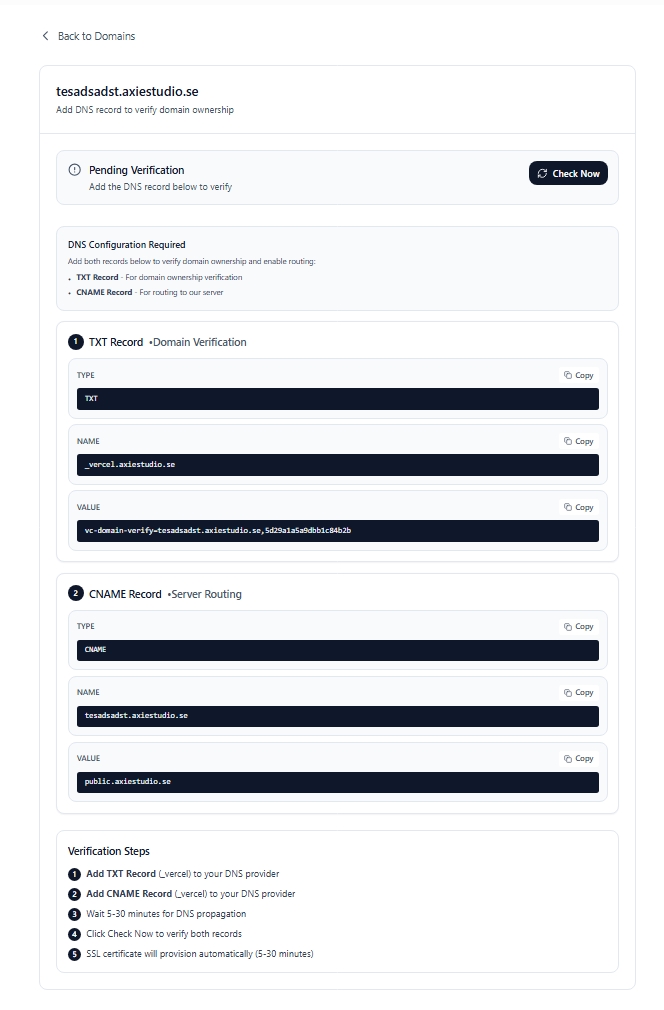
Step 2: Add DNS Records
After adding your domain, you'll see exact instructions for what DNS records to add. You need to add TWO records:
- TXT Record (for verification) - This proves you own the domain
- CNAME Record (for routing) - This tells the internet where to send traffic
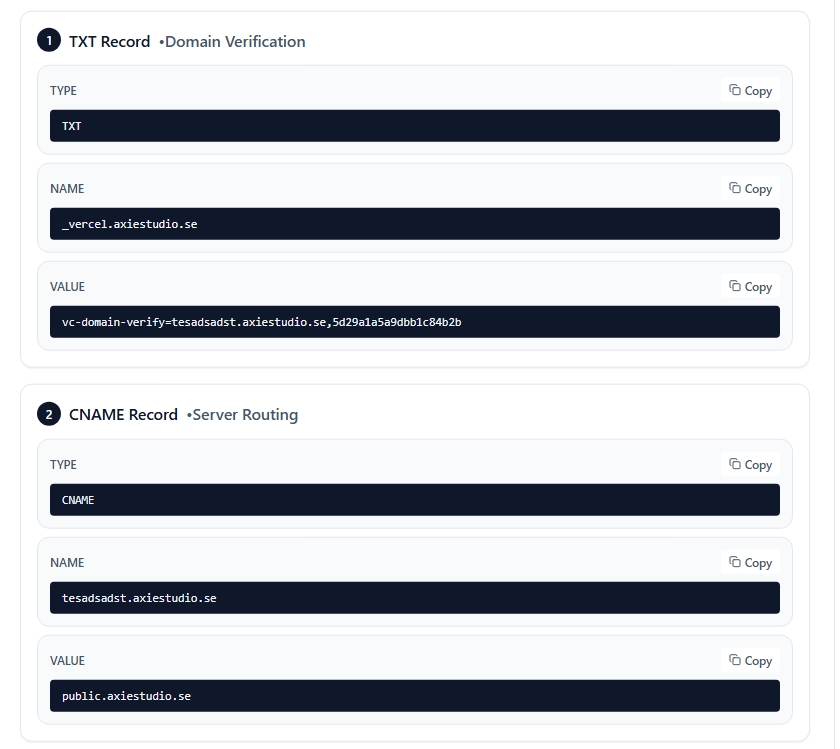
The verification page shows you exactly what to add. You'll see:
- TXT Record: Type, Name (usually
_vercel), and Value (a long verification code) - CNAME Record: Points your domain to
public.axiestudio.se
How to add DNS records:
- Log in to your domain registrar (where you bought the domain - GoDaddy, Namecheap, Cloudflare, etc.)
- Find the DNS settings or DNS management section
- Add both records exactly as shown in the instructions
- Save your changes
DNS Propagation: After adding DNS records, it can take 5-60 minutes for them to work everywhere. Some places might see the change in minutes, others might take longer. This is normal!
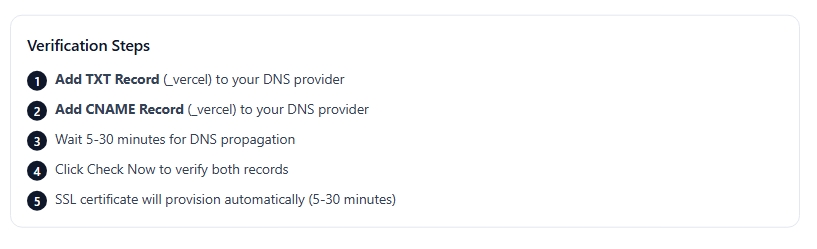
Step 3: Verify Your Domain
Once you've added the DNS records:
- Go back to your Axie Studio dashboard
- Click on your domain in the list (or click "Verify" if you see that button)
- Click "Verify Domain" button
- Wait a few seconds - the system checks if your DNS records are correct
The verification page shows you everything you need:
- Current verification status
- The DNS records you need to add (with copy buttons!)
- Which chat interface is connected
- SSL certificate status
What the statuses mean:
- Pending: You just added the domain, waiting for you to add DNS records
- Checking: We're verifying your DNS records right now (takes a few seconds)
- Verified: ✅ Your DNS is correct! SSL certificate is being provisioned
- Failed: DNS records aren't correct yet - double-check them
Important: After verification, your domain is NOT active yet. You need to activate it in the next step.
Step 4: Activate Your Domain
Once your domain shows "Verified":
- You'll see an "Activate" button (or toggle switch)
- Click it to activate your domain
- Your domain is now live! 🎉
The configuration summary shows you everything at a glance:
- Domain name and status
- Connected chat interface (you can change this anytime)
- Verification status
- SSL certificate status (should be "Active" after a few minutes)
- All DNS records
Why do we have a separate "Activate" step? This is a security feature. Even after verification, domains are inactive by default. This prevents someone from accidentally making a domain live before they're ready, or if there's a configuration issue.
Testing Your Domain
After activation, test it:
- Open a new browser window (or incognito mode)
- Visit your domain:
https://support.yourcompany.com(use your actual domain) - You should see your chat interface
- Check the URL bar - it should show your domain, not
public.axiestudio.se
Success! If you see your chat interface on your domain, everything is working perfectly! 🎉
What if it's not working?
- Make sure the domain status is "Active" (not just "Verified")
- Check that your chat interface is also active
- Wait a few minutes - DNS changes can take time to propagate
- Try clearing your browser cache or using incognito mode
Common Issues & Solutions
"Verification Failed" or "Checking" Status Stuck
What to check:
- DNS Records: Make sure you added BOTH the TXT and CNAME records
- Wait Time: DNS can take 5-60 minutes to propagate. Be patient!
- Exact Values: Copy the values exactly - no extra spaces or typos
- Record Type: Make sure you're adding TXT (not text) and CNAME (not cname)
How to fix:
- Double-check your DNS records match exactly what's shown in the dashboard
- Use an online DNS checker (like
dnschecker.org) to see if your records are live - Wait 10-15 minutes and click "Verify" again
SSL Certificate Not Ready
What's happening:
- SSL certificates are provisioned automatically by Vercel
- This happens AFTER your domain is verified
- Usually takes 5-30 minutes
What to do:
- Wait a bit longer (up to 30 minutes is normal)
- Make sure your domain shows "Verified" status first
- SSL will automatically become "Active" when ready
- You don't need to do anything - it's automatic!
Domain Shows "Verified" But Not Working
Most common cause: Domain is verified but not activated!
Solution:
- Go to your domain in the dashboard
- Look for the "Activate" button or toggle
- Click it to activate your domain
- Status should change to "Active"
Other things to check:
- Is your chat interface active? (Go to Chat Interfaces page)
- Did you wait a few minutes after activation? (DNS propagation)
- Try visiting the domain in an incognito/private browser window
404 Error When Visiting Domain
This means:
- Your domain is routing correctly (good!)
- But it's not finding the chat interface (configuration issue)
Check:
- Domain status is "Active" (not just "Verified")
- Chat interface is "Active" (check Chat Interfaces page)
- Domain is connected to the correct chat interface
- Wait 2-3 minutes after making changes (cache refresh)
"Domain Already Exists" Error
This means:
- Someone (maybe you) already added this domain
- Or the domain is reserved by Axie Studio
What to do:
- Check your domains list - you might have already added it
- If it's not in your list, contact support
- Try a different subdomain (e.g.,
chat.yourcompany.cominstead ofsupport.yourcompany.com)
Best Practices
Use Subdomains
Use support.yourcompany.com rather than yourcompany.com. This is:
- Easier to configure
- Safer (doesn't affect main domain)
- More flexible
Test DNS First
Before adding the domain, test your DNS records work:
- Use online DNS checkers
- Verify records are correct
- Wait for propagation
Keep It Active
Make sure your domain stays active:
- Don't delete DNS records
- Keep domain active in dashboard
- Monitor for issues
Managing Multiple Domains
You can add as many domains as you need (based on your plan):
Different domains, different interfaces:
support.yourcompany.com→ Customer Support chatsales.yourcompany.com→ Sales chathelp.yourcompany.com→ Help desk chat
Multiple domains, same interface:
support.yourcompany.com→ Main Support chatchat.yourcompany.com→ Same Support chat (alternative URL)help.yourcompany.com→ Same Support chat (another alternative)
Changing which interface a domain points to:
- Click on any domain in your list
- You'll see a dropdown to change the connected chat interface
- Changes take effect immediately (no re-verification needed)
Rate Limits:
- You can create up to 10 domains per hour
- You can verify up to 20 domains per hour
- These limits prevent abuse and ensure system stability
Security Features
Automatic SSL Certificates:
- Every domain gets a free SSL certificate automatically
- Certificates are provisioned by Vercel (industry standard)
- Your domain will always use HTTPS (secure connection)
- Certificates renew automatically - you don't need to do anything
Domain Verification:
- You must prove you own the domain (via DNS records)
- This prevents someone else from using your domain
- Only verified domains can be activated
Activation Control:
- Domains are inactive by default, even after verification
- You must manually activate each domain
- This gives you control over when domains go live
Access Control:
- Only you (and your team, if on Enterprise plan) can manage your domains
- Each domain is tied to your account
- You can deactivate domains anytime without deleting them
Next Steps
Ready to set up your domain? Go to Dashboard -> Domains and click "Add Domain"!