step-by-step-guide
sidebar_position: 2
Step- by- Step: Set Up Knowledge Base & RAG
This comprehensive guide walks you through setting up a Knowledge Base with RAG (Retrieval Augmented Generation) in Axie Studio.
Overview
Time Required: 10- 15 minutes What You'll Create: A knowledge base that enables AI to answer questions using your documents Result: AI- powered Q&A with source citations
Step 1: Navigate to Knowledge Base
What You'll See
- Sign in to your Axie Studio account
- In the dashboard sidebar, click "Knowledge Base" (or "Agent Configuration")
- You'll see the Knowledge Base page with:
- A title bar: "AGENT CONFIGURATION"
- Two- column layout:
- Left: Configuration options
- Right: Chat preview
Visual Description
 AGENT CONFIGURATION
 Configure your AI agent's capabilities and connections


 Configuration Chat Preview
 (Left Column) (Right Column)

 [Connection Banner] [Chat Interface]
 [Config Sections] [Messages]
 [Input Field]
Step 2: Connect a Chat Interface
What You'll See
If no chat interface is connected, you'll see a Connection Banner:
Visual:
 No Chat Interface Connected

 You need to connect a chat interface to configure
 your knowledge base.

 [Connect Interface] button
Step 2.1: Click "Connect Interface"
Button: "Connect Interface" Location: In the connection banner
What Happens:
- Opens a dialog
- Shows list of your chat interfaces
- Allows you to select one
Step 2.2: Select Chat Interface
Dialog: "Connect Chat Interface"
What You'll See:
- List of your chat interfaces
- Each interface shows:
- Name
- Slug
- Status (Active/Inactive)
Visual:
 Connect Chat Interface


 Select a chat interface to connect:

 Customer Support
 slug: customer- support
 Status: Active

 Sales Chat
 slug: sales- chat
 Status: Active

 [Cancel] [Connect]
Step 2.3: Confirm Connection
Button: "Connect" What Happens:
- Connects the interface
- Creates knowledge base configuration (if needed)
- Banner disappears
- Configuration sections appear
Step 3: Configure Core Settings
What You'll See
After connecting, you'll see Configuration Sections organized in an accordion:
- Tool Overview
- Core Settings (System Prompt, LLM)
- Advanced Settings (Embeddings, Vector Store, Parser)
- Helper Tools (Webhook, Chat Input/Output, etc.)
- Connections (Composio, Form Builder)
Step 3.1: Configure System Prompt
Section: "Core Settings" "System Prompt"
What You'll See:
- A card showing current system prompt
- "Configure" button
Visual:
 System Prompt

 You are a helpful AI assistant.

 [Configure] button
Action:
- Click "Configure"
- Dialog opens with text area
- Enter your system prompt
- Click "Save"
Example System Prompt:
You are a helpful customer support assistant for Acme Corporation.
Answer questions using the provided documents. Always cite your sources.
Be friendly, professional, and concise.
Step 3.2: Configure LLM Provider
Section: "Core Settings" "LLM Provider"
What You'll See:
- Card showing current LLM settings
- Provider dropdown
- Model selection
- API key field
Visual:
 LLM Provider

 Provider: [OpenAI ]
 Model: [GPT- 4 ]
 API Key: [] [Configure]

 [Configure] button
Action:
- Click "Configure"
- Dialog opens with:
- Provider dropdown (OpenAI, Cloudflare Workers AI, DeepSeek)
- Model dropdown (depends on provider)
- API Key field
- Select provider and model
- Enter API key
- Click "Save"
Recommended:
- Provider: OpenAI
- Model: GPT- 4 (or GPT- 3.5- turbo for cost savings)
- API Key: Your OpenAI API key
Step 4: Configure Advanced Settings
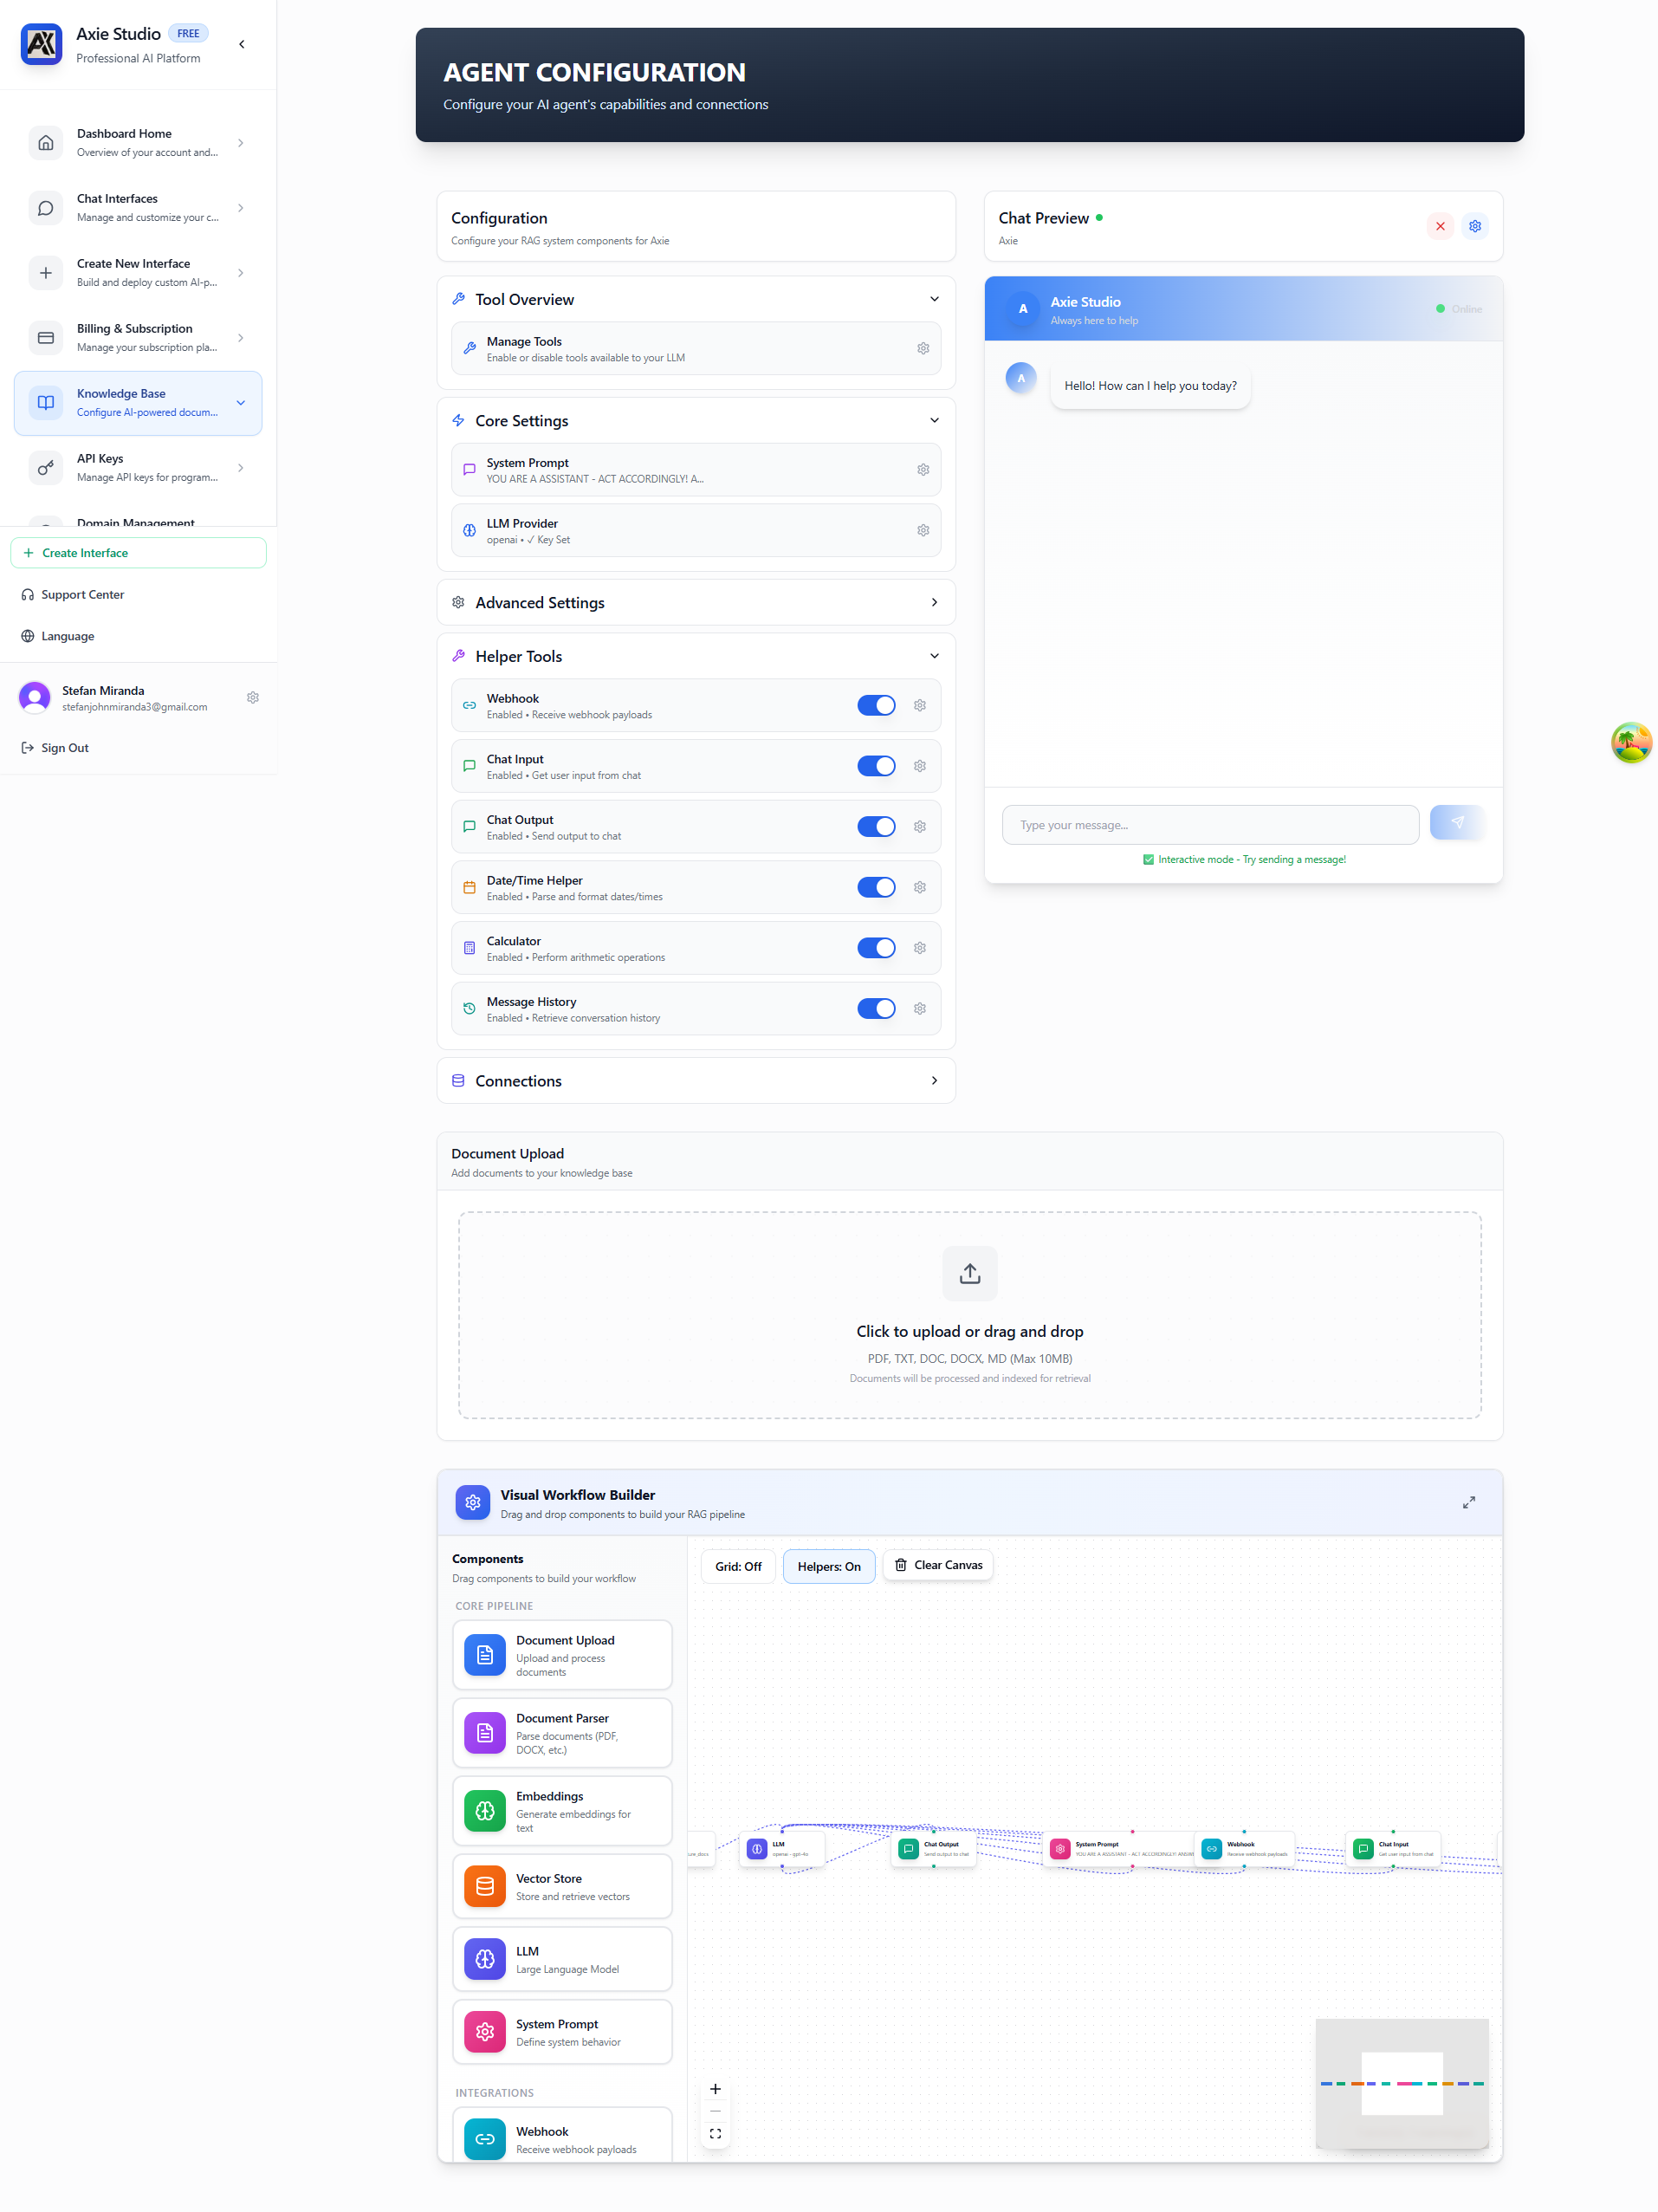
The Knowledge Base page shows your complete RAG configuration. The left column contains all configuration sections, the right column shows a live chat preview, and the bottom section displays a visual workflow builder that illustrates how your RAG pipeline components are connected. The Advanced Settings section contains configuration options for embeddings, vector store, document parser, and other advanced RAG components.
Step 4.1: Configure Embeddings
Section: "Advanced Settings" "Embeddings"
What You'll See:
- Card showing embedding model
- API key field
Visual:
 Embeddings

 Model: voyage- large- 2
 API Key: [] [Configure]

 [Configure] button
Action:
- Click "Configure"
- Dialog opens with:
- Model dropdown (voyage- large- 2, voyage- 3- large, etc.)
- API Key field
- Select model
- Enter Voyage AI API key
- Click "Save"
Step 4.2: Configure Vector Store
Section: "Advanced Settings" "Vector Store"
What You'll See:
- Card showing vector store settings
- ChromaDB configuration
Visual:
 Vector Store

 Provider: ChromaDB
 Collection: [your- collection- name]
 API Key: [] [Configure]

 [Configure] button
Action:
- Click "Configure"
- Dialog opens with:
- API Key field
- Tenant field
- Database field
- Collection name field
- Enter ChromaDB credentials
- Click "Save"
Step 5: Upload Documents
What You'll See
In the right column, you'll see the Chat Preview with an upload section.
Step 5.1: Access Upload Area
Location: Right column, below chat preview
What You'll See:
- File upload area
- Drag- and- drop zone
- "Upload Documents" button
Visual:
 Upload Documents


 Drag files here or click to upload

 Supported: PDF, DOCX, TXT
 Max size: 10MB per file


 [Upload Documents] button
Step 5.2: Upload Files
Action:
- Click "Upload Documents" or drag files
- File picker opens
- Select files (PDF, DOCX, or TXT)
- Files upload automatically
What Happens:
- Files are processed
- Text is extracted
- Documents are chunked
- Embeddings are generated
- Documents are stored in ChromaDB
Progress Indicator:
Uploading: document.pdf
Processing... [] 80%
Step 5.3: Verify Upload
What You'll See:
- Success message
- Document appears in list
- Status: "Processed" or "Processing"
Visual:
 Uploaded Documents


 document.pdf
 Status: Processed
 Chunks: 45

 large- document.pdf
 Status: Processing...
 Progress: 60%
Step 6: Test Your Knowledge Base
What You'll See
In the Chat Preview (right column), you can test your knowledge base.
Step 6.1: Ask a Question
Location: Chat input field in preview
Action:
- Type a question related to your documents
- Press Enter or click Send
Example:
What is your return policy?
Step 6.2: See AI Response
What You'll See:
- AI processes the question
- Searches your documents
- Generates answer
- Shows source citations
Visual:
 User: What is your return policy?

 AI: Our return policy allows returns within 30 days
 of purchase. You can request a refund by
 contacting support@yourcompany.com.

 Source: Returns Policy.pdf, page 3
Step 7: Enable Tools (Optional)
What You'll See
Section: "Tool Overview"
Visual:
 Tool Overview


 Core Tools
 search_knowledge_base
 confirmation_required

 Advanced Tools
 web_search
 code_execution

 [Manage Tools] button
Step 7.1: Open Tool Overview
Button: "Manage Tools" Action: Click to open tool management dialog

Step 7.2: Enable Tools
Dialog: "Tool Overview"
What You'll See:
- List of all available tools
- Toggle switches for each tool
- Tool categories
Action:
- Toggle tools on/off
- Click "Save"
Visual Workflow Summary
 STEP 1: Navigate to Knowledge Base
 Dashboard Knowledge Base


 STEP 2: Connect Chat Interface
 [Connect Interface] Select interface


 STEP 3: Configure Core Settings
 - System Prompt
 - LLM Provider & Model
 - API Keys


 STEP 4: Configure Advanced Settings
 - Embeddings (Voyage AI)
 - Vector Store (ChromaDB)
 - Parser settings


 STEP 5: Upload Documents
 Drag & drop or click to upload
 Wait for processing


 STEP 6: Test Knowledge Base
 Ask questions in chat preview
 Verify answers and sources


 STEP 7: Enable Tools (Optional)
 Manage tools in Tool Overview
 Enable/disable as needed
Common Questions
How long does document processing take?
Usually 1- 2 minutes per document, depending on size.
Can I upload multiple documents?
Yes! Upload as many as you need. Each is processed separately.
What file formats are supported?
PDF, DOCX, and TXT files. Max 10MB per file.
How do I know if documents are processed?
Check the status indicator. "Processed" means ready to use.
Can I delete documents?
Yes, from the document list. Click the delete icon.
Next Steps
- [Create a chat interface ](/docs/chat- interface/intro)
- Set up custom domain →
- View analytics
Ready to set up your knowledge base? Go to Dashboard Knowledge Base and get started!